 | Dad Shanhun just celebrated his birthday, and I thought I’d share it here. This idea would be perfect for Father’s Day. |
| I started with my go-to A5 folded card. You could cut and scorethe following cardstock (or any in your stash that will tone in with the paper you are using. | |
| I chose a masculine stonework patterned paper you could try: | |
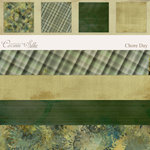
| Fancy Pants Designs - Like Father Like Son Collection - 12 x 12 Double Sided Paper - Big Guy Scrapbook.com | E-Paper Kit - Chore Day 1 Scrapbook.com |
| I then used some glue tap to stick on 2 pieces of black satin ribbon: | |
| and stuck on some letter stickers. |
Saturday, June 18, 2011
Fathers Day Card ideas
Sunday, May 29, 2011
How to add brushes to Photoshop Elements
Wednesday, March 16, 2011
Get-it-done Guy style wardrobe organisation for small spaces
After 6 years of wearing uniforms (aka prison clothes as Phill fondly referred to them!), Phill’s finally wearing office clothes regularly which is great, he enjoys being able to avoid work boots and thick cotton fire-retardant clothing for a change. The only problem is the in our ‘apartment’ we don’t have a lot of space, and the hanging space is in Emily’s room.
I remembered a tip from the Get it done Guy on how to organise your clothes. His example below.


Thanks Get it Done Guy!
Related articles
- Project: Simplify - Hotspot #1 (allfivehorizons.co.uk)
Thursday, March 3, 2011
Handmade Card–Girl’s first birthday card

If you want to follow along here's a link to some equivalent products. As I make cards from my stash, quite a lot of items are discontinued.
- Pink A5 scored card
- Pink cardstock
- Baby theme paper
- Clear embossing powder
- Tsukineko Orchid ink
- Pinking shears
- Fiskars Easy Press Clear Stamps alphabet – Script font
- Heat gun
Make the Base Card
- Freehand draw or print out a large number 1 and trace around it onto a patterned paper you love. Ink the edges.
- Cut a strip of patterned paper with pinking shears
 Make the Rosette
- Create the rosette by cutting a 5cm wide strip of pink cardstock, about 20cm long. Ink the edges
- Fold the cardstock backwards and forwards ever 5mm. Glue the ends together.
- Cut a 3cm circle, stamp with an initial.
- Cover with embossing powder, shake off the excess and heat with a heat gun until smooth.
- Ink the edges.
- Glue over the centre of the rosette.
Glue the rosette onto the number 1 on the front of my card.
There you have it a gorgeous card!
Have you made a card lately? Stay tuned to my blog for more step by step card making instructions!
Melissa

Thursday, February 3, 2011
All about my name

I feel odd doing a very ME focussed page and have spent far too long fussing over it!
I've always loved my name. I guess this became a big thing for me when I read Anne of Green Gables where Anne hated being called Ann and often wished to be called Cordelia. Mum and Dad liked the names Melissa and Melanie. Mum always enjoyed the Little House on the Prairie TV series, there were two actresses named Melissa (Melissa-Sue Anderson being one of them). Melissa means honeybee, and I like the thought that I can be industrious and produce something delicious like them!
Caroline, my middle name means ladylike, and I love that! I'm named after Caroline Okely, who was the daughter of farmers in the North Beach area. She was called Carine for short and there's now a suburb named after her.
My favourite colour (pink) my handwriting font, my story about my name! All about me! The kit is Honeybee by One Little Bird
Some tips from this LO:
- I masked out my little in the honeybee word art to create a title
- I masked off the end of the pink large ribbon so you can read the title
- To create the journalling box I drew a rounded rectangle using the Shape tool in PSE and clipped cream paper to it
- I clipped the stamped bee onto the cream paper and reduced the opacity to 18%
- I clipped the photo to the included mask for the fancy frame
 thanks for including that Peppermint!!
 - To make the ribbons look unique I slightly rotate some and also flipped on (Image>Rotate>Flip Layer Horizontal)
- Shadowed using Flergs Shadow Styles Freebie from flergalicious.com
- To shadow the bee with translucent wings I followed the tutorial by Jessica Sprague here
PS I was featured as layout of the week over at LYM with this layout!

*affliliate links where possible*
Wednesday, December 15, 2010
13 December 2010
I was inspired to reuse my layout for 9 December today, it will be a fewpages later in the finished album, so why not? So I rotated the photo placeholder and embellished a little differently. A lovely quick page!
Today was a run around kind of day. Emily had her 18month immunisations - she was a very brave girl and got a blue jelly bean. She also had her child health check, I went to see the Chiro. I worked on Phill’s card and present wrapping. Mum O and Cait joined us to check out the progress of the house. The electrical channels are now cut in and the roof structure is complete. Now for the tiling!
Mum S made these mini presents with a little verse and sweet treat inside for Dad S to give out to his work mates, they were too cute!
SupplyTracker by SpeedScraps
Scrapbookgraphics Santa Brings Goodies blog train items by Flergs and Dawn Inskip
Madame Wing and Sugarplum Paperie Candy Christmas
Syrin Stitched Christmas
Tangie Vintage Christmas Flashcards
Sweet Shoppe Designs All I want for Christmas Paper and Journalling Card
Want to support my blog? Check out the Digi Game
*affliliate links where possible*
Thanks so much for all your comments and retweets!
Melissa


